
Getting Started![]() Summary
Summary![]() Transactions
Transactions![]() Categories
Categories![]() Reports
Reports![]() Settings
Settings![]() Backup & Restore
Backup & Restore![]() Glossary
Glossary![]()
Getting Started
TopChoose Your Time Period
First of all you need to choose how you would like to Track your Spending. For example, if you are paid Monthly, then it would make sense to Track your Spending on a Month by Month basis. You can set your preferred Time Period in the 'Settings' screen.Choose Your Tracking Mode
If you simply want to Track whether you have spent more than you have earnt then there is nothing else to set up. However you have the option to operate in Budget Mode instead. This will allow you, for example, to set a Spending limit of 500 per Month. You can turn on Budget Mode in the 'Settings' screen.Enter Your Spending
By simply logging all your Expense and Income Transactions you will be able to gain better control over your Spending. You can either enter your Transactions from the 'Summary' screen, or from the 'Transactions' screen.Track Your Spending
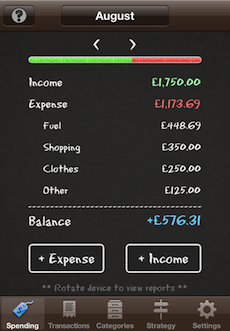
The 'Summary' screen gives you a quick overview of your current Spending status. It will tell you whether you have Over Spent or Under Spent and where the majority of your money has gone. You can choose different Time Periods to display (Weekly, Monthly or Yearly), or navigate backwards and forwards in time.The 'Reports' allow you to analyse your Spending in greater depth. They show you the Spending breakdown by Category and a history of your Cash Flow over time.
Summary
TopIn this section you can see an overview of your Spending.
Figures ExplainedFigures Explained
TopIncome or Budget
This is the total of your Income Transactions in the displayed Time Period. In Budget Mode this is the total of your Budget Amount plus your Income Transactions.Expense
The total of all your Expense Transactions in the displayed Time Period.Top Categories
A breakdown of your Expense Transactions by Category with only the highest totals displayed.Balance or Remaining
The Income minus the Expense. In Budget Mode this is the Budget minus the Expense.Adding Transactions
Top You can use the '+ Expense' and '+ Income' buttons to quickly add Expense and Income Transactions.Time Travel
Top You can use the left and right arrows at the top of the screen to navigate backwards and forwards in time. You can also tap on the date button to switch to a different Time Period e.g. switch between Weekly, Monthly or Yearly.Transactions
TopIn this section you can view all your transactions, add new transactions, and update or delete existing transactions.
EnteringEntering
TopClick on the '+' icon at the top right of the screen to add a new one or tap on an existing Transaction to edit it. You must enter certain key details for each Transaction.
![]()
Date
The date on which the Transaction occurred.Amount
The monetary amount of the Transaction.Category
The Category the Transaction falls into e.g. Clothes, Salary.Repeating
See 'Repeating'Note
An optional Note to add some extra details about the Transaction. If the Note is entered then it will replace the Category name in the list of Transactions.Once you have entered all the key details then press 'Done' to save your changes.
Repeating *
Top* Pro Feature. Upgrade to Pro via the Settings.
Transactions you set to be 'Repeating' will be automatically generated from the Transaction 'Date' onwards. Note that if you alter the Repeating Details for an existing Transaction, then all the existing occurrences will be deleted and new ones created.
![]()
Repeating
Specifies that the Transaction will automatically repeat.Repeat
The frequency at which the Transaction repeats e.g. Weekly, Monthly.Every
How often the Transaction repeats e.g. Every 2 Months.End Date
An optional end date at which the Transaction should stop repeating.Sorting
TopBy tapping on the Sort button you can choose to sort the Transactions in the following ways:
Date (Newest First)
The Transactions will be ordered by Date, with the newest ones appearing first.Date (Oldest First)
The Transactions will be ordered by Date, with the oldest ones appearing first.Amount (Highest First)
The Transactions will be ordered by Amount, with the highest amounts appearing first.Amount (Lowest First)
The Transactions will be ordered by Amount, with the lowest amounts appearing first.Name (A-Z)
The Transactions will be ordered by Name, in alphabetical order.Date (Z-A)
The Transactions will be ordered by Name, in reverse alphabetical order.Exporting *
Top* Pro Feature. Upgrade to Pro via the Settings.
The export icon

allows you to export your Transactions in CSV format via Email. You can then load the file into a spreadsheet. Just specify what date range you wish to export, then press Export Now.
Time Travel
Top You can use the left and right arrows at the top of the screen to navigate backwards and forwards in time. You can also tap on the date button to switch to a different Time Period e.g. switch between Weekly, Monthly or Yearly.Reports
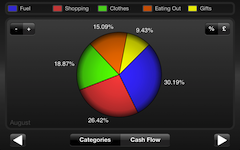
TopOnce you have entered some 'Transactions', the 'Reports' will become available. To access them, make sure you are in the 'Summary' or 'Transactions' screen and rotate the device so that it is on its side. You will then be presented with interactive reports to allow you to analyse your Spending (rotation not required for iPad).
Categories
The Categories report shows your Expense or Income totalled by Category for a particular Time Period, giving you a good idea of where your money is going. You can switch between showing 'Expense' or 'Income', and between 'Percent' or 'Monetary Amount'. The arrow buttons at the bottom left and right allow you to Time Travel backwards and forwards.
Cash Flow
The Cash Flow report shows a history of your total Expense and Income per Time Period. Up to 12 months (or weeks) worth of history are shown, depending on how much historic data you have entered. This gives you a 'Trend' of your Spending over time.
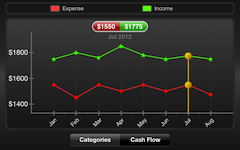
Press and Hold
Press and hold on the chart to show values for a particular Time Period. Slide your finger along to show values for other Time Periods.Pinch to Zoom
Pinch along the years axis to decrease or increase the date range. Double tap to reset.To exit the 'Reports' screen, simply rotate the device back to the upright position (not required for the iPad).
Settings
TopHere you can configure certain behaviour in the app:
Time Period
Choose how you would like to Track your Spending. You can Track it Weekly, Monthly or Yearly. Whenever you start the app, this will be the Time Period it defaults to.Show Spending
Choose from Weekly, Monthly or Yearly.Month Start Day
When Spending is Tracked Monthly, this determines the first day to show. e.g. set it to '8' to display September as '8th September - 7th October'.Week Start Day
When Spending is Tracked Weekly, this determines the first day to show. e.g. set it to 'Tuesday' to display a week as 'Tuesday - Monday'.Budget
Here you can optionally turn on Budget Mode. This will allow you, for example, to set a Spending limit of 500 per Month so you can easily see how much you have left to spend. Any Income Transactions you add will increase your Budget for that Period.Budget Mode
Turn this on if you want to see how much money you have left to spend based on your Budget.Budget Amount
Set your Budget. If you choose to Track your spending Monthly by default, then this will be your Monthly Budget and so on.Carry Over
Turn this on to Carry Over any remaining money from the previous Time Period. This will then increase your Budget for the next Time Period. The Carry Over gets created as a new Transaction and is highlighted in green in the Transactions list.Passcode
If you wish to protect your data from others, you can set a Passcode which you must enter to gain access to the app. Please remember this code.Currency Symbol
By default the app will pick up the currency symbol from your device settings. Settings -> General -> International -> Region Format. If you wish to override this and pick your own currency symbol, you can choose one here.Backup & Restore *
Top* Pro Feature. Upgrade to Pro via the Settings.
To Backup or Restore your data, tap on the 'Backups' button on the top right of the main Settings screen. Note that you will need an active network connection to perform backups or restores.
Dropbox
Backups are stored online, using the popular service called 'Dropbox'. The first thing you will need to do is 'Link to Dropbox'. Press the green button in the 'Backups' screen to do this. You will be prompted to register for a Dropbox account if you do not already have one. It will then request your permission for Debt Manager to access your Dropbox account. If you accept, then you will be redirected back to Debt Manager. You should now be ready to backup and restore your data.Backup
In the 'Backups' screen, you should now have a green button which says 'Backup Now'. Tap this button to create a backup of your debt data. It will create a file with the name which is the current date and time. You can make as many backups as you like.Restore
If you want to 'Restore' a particular backup, just tap on the relevant name. It will validate the backup to make sure that it is valid.Delete
To 'Delete' a particular backup, tap on the red button to the left of the entry.Glossary
TopBalance
This is the difference between your Income and Expense.Budget
In Budget Mode, this is the amount you have to Spend on Expenses in each Time Period.Budget Mode
An alternative way of Tracking your Spending which allows to Track your Spending against a set Budget.Carry Over
In Budget Mode, this is an amount carried over from a previous Time Period if there was any of your Budget Remaining.Category
A way of categorising Transactions. For example, e.g. 'Clothes' or 'Salary'.Expense
Any Spending.Income
Any earnings.Over Spend
In Budget Mode, this is how much you have gone over your Budget by.Remaining
In Budget Mode, this is how much you have left to spend.Transaction
This is any Expense or Income event.Credits
Top Charts Ray Wenderlich Cocoa With LoveDisclaimer
TopThe data presented in this app should serve as a guide only. We are not accountable for any actions taken based on usage of this app.