
Getting Started![]() Budgets
Budgets![]() Transactions
Transactions![]() Categories
Categories![]() Accounts
Accounts![]() Reports
Reports![]() Settings
Settings![]() Syncing
Syncing![]() Glossary
Glossary![]()
Getting Started
TopChoose Your Time Period
First of all you need to choose how you would like to Track your Budgets. For example, if you are paid Monthly, then it would make sense to Track your Budgets on a Month by Month basis. You can set your preferred Time Period in the 'Settings' screen.Create Your Budgets
From the 'Budgets' screen, you can add one or more Budgets that you would like to Track. For example, you may want to set up one Budget for 'Shopping', one for 'Clothes' and another for 'Eating Out'.Enter Your Spending
Each time you enter an Expense or Income Transaction, this will instantly be reflected in the corresponding Budget e.g. if you enter a new Transaction for the 'Clothes' Category, then the remaining 'Clothes' Budget for that month will be reduced accordingly. You can either enter your Transactions from the 'Budgets' screen, or from the 'Transactions' screen.Track Your Budgets
The 'Budgets' screen gives you a quick overview of your current Budget progress. It will tell you how much you have left to spend within each Budget. You can choose different Time Periods to display (Weekly, Monthly or Yearly), or navigate backwards and forwards in time.The 'Reports' allow you to analyse your Budgets in greater depth. They show you how much is remaining for each Budget, your Transactions broken down by Category and a history of your Cash Flow over time.
Budgets
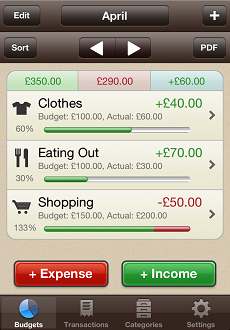
TopIn this section you can view all your Budgets, add new Budgets, and update or delete existing Budgets.
EnteringEntering
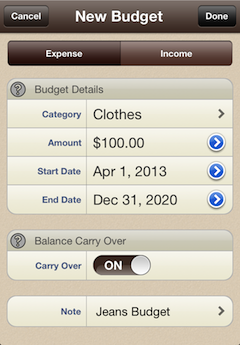
TopTap on the '+' icon at the top right of the screen to add a new Budget. If you want to update one, then tap the 'Edit' button at the top left, then tap on the Budget you want to edit. You must enter certain key details for each Budget.
Type
A Budget can be either an 'Expense' or an 'Income' type. Typically you would leave this as 'Expense'. An 'Income' type may be useful if you want to Track your monthly earnings for example.Category
The Category the Budget falls into e.g. 'Clothes', 'Eating Out'.Amount
The amount you would like to limit your Spending to.Start Date
The date at which to start Tracking the Budget.End Date
An optional date at which to stop Tracking the Budget.Account
If you have multiple Accounts, then you need to choose the Account to link the Budget to.Balance Carry Over
Turn this on to carry over the remaining Balance from one month to the next.Note
An optional Note to add some extra details about the Budget.Once you have entered all the key details then press 'Done' to save your changes.
Figures Explained
Top Each Budget entry shows a number of important details as follows:- Budget - The total Budget Amount, including any Carry Over
- Actual - The amount of your Budget which has been used up
- Balance - This is the remaining amount, which may be negative if you have overspent
- Progress Bar - This fills up as you spend your Budget. If you overspend, then that portion is shown in red.
Viewing Transactions
Top Tap on an individual Budget to see all the Transactions which have been assigned to the same Category. The sum of these Transactions should equal the 'Actual' amount for the Budget.Sorting
TopBy tapping on the Sort button you can choose to sort the Budgets in the following ways:
Balance (Lowest First)
The Budgets will be ordered by remaining Balance, with the lowest Balances appearing first.Balance (Highest First)
The Budgets will be ordered by remaining Balance, with the highest Balances appearing first.Budget (Smallest First)
The Budgets will be ordered by Budget Amount (including Carry Over), with the smallest amounts appearing first.Budget (Largest First)
The Budgets will be ordered by Budget Amount (including Carry Over), with the largest amounts appearing first.Category (A-Z)
The Budgets will be ordered by Category Name, in alphabetical order.Category (Z-A)
The Budgets will be ordered by Category Name, in reverse alphabetical order.PDF Report *
Top* Pro Feature. Upgrade to Pro via the Settings.
Tap on the PDF button to format your Budgets and Transactions into a PDF Report. You can view the PDF Report within the app, email it, or print it using AirPrint.
Time Travel
Top You can use the left and right arrows at the top of the screen to navigate backwards and forwards in time. You can also tap on the date button to switch to a different Time Period e.g. switch between Weekly, Monthly or Yearly.Transactions
TopIn this section you can view all your transactions, add new transactions, and update or delete existing transactions.
EnteringEntering
TopClick on the '+' icon at the top right of the screen to add a new one or tap on an existing Transaction to edit it. You must enter certain key details for each Transaction.
![]()
Date
The date on which the Transaction occurred.Amount
The monetary amount of the Transaction.Category
The Category the Transaction falls into e.g. Clothes, Salary.Account
If you have multiple Accounts, then you need to choose the Account to link the Transaction to.Repeating
See 'Repeating'Note
An optional Note to add some extra details about the Transaction. If the Note is entered then it will replace the Category name in the list of Transactions.Once you have entered all the key details then press 'Done' to save your changes.
Repeating *
Top* Pro Feature. Upgrade to Pro via the Settings.
Transactions you set to be 'Repeating' will be automatically generated from the Transaction 'Date' onwards. Note that if you alter the Repeating Details for an existing Transaction, then all the existing occurrences will be deleted and new ones created.
![]()
Repeating
Specifies that the Transaction will automatically repeat.Repeat
The frequency at which the Transaction repeats e.g. Weekly, Monthly.Every
How often the Transaction repeats e.g. Every 2 Months.End Date
An optional end date at which the Transaction should stop repeating.Sorting
TopBy tapping on the Sort button you can choose to sort the Transactions in the following ways:
Date (Newest First)
The Transactions will be ordered by Date, with the newest ones appearing first.Date (Oldest First)
The Transactions will be ordered by Date, with the oldest ones appearing first.Amount (Highest First)
The Transactions will be ordered by Amount, with the highest amounts appearing first.Amount (Lowest First)
The Transactions will be ordered by Amount, with the lowest amounts appearing first.Name (A-Z)
The Transactions will be ordered by Name, in alphabetical order.Date (Z-A)
The Transactions will be ordered by Name, in reverse alphabetical order.Filtering
TopBy pulling down the Transactions list you reveal the 'Filter & Search' widget.
Tap on the button which says 'All Categories' to bring up a picker which lets you choose a specific Category. Once you select a Category, only the Transactions which are filed against this Category show in the list. Press 'Cancel' to stop filtering.
Searching
TopBy pulling down the Transactions list you reveal the 'Filter & Search' widget.
Tap on the Search box, type in your search term, then press the 'Search' button on the keyboard. Only the Transactions which match the search term will be displayed. You can search against the Category Name, Note or Amount. Press 'Cancel' to stop searching.
CSV Export *
Top* Pro Feature. Upgrade to Pro via the Settings.
The export button allows you to export your Transactions in CSV format via Email. You can then load the file into a spreadsheet. Just specify what date range you wish to export, then press Export Now.
Time Travel
Top You can use the left and right arrows at the top of the screen to navigate backwards and forwards in time. You can also tap on the date button to switch to a different Time Period e.g. switch between Weekly, Monthly or Yearly.Categories
TopBudgets and Transactions are filed into different Categories to make it easy to organise them. You can add new Categories, or rename or change the icon of existing Categories via the Categories tab. Tap on a Category to change its details, or press Edit if you want to delete one.
Accounts
TopBudgets and Transactions may be stored in different Accounts. For example, you may want different Accounts for different people.
Creating & EditingAdding
TopIn Settings -> Accounts, you can add new Accounts, or rename existing ones. You can also assign a colour to an Account. Once you have more than one Account defined, you then have to specify the Account name when adding a new Transaction.
Note that the initial account is the 'Personal' account, and this cannot be deleted.
Switching
TopOnce you have defined more than one Account, then a new button appears at the top right of the Budgets and Transactions tabs:

Settings Per Account
TopOnce you have defined multiple Accounts, then some of the Settings can be made per Account.
- Time Period - e.g. one Account may be tracked Monthly, the other Weekly
- Budgets - you may want to set up a different Budget Amount per Account
- Carry Over - you may not want to generate Carry Over for a Savings Account
- Hide Future Transactions
Reports
TopOnce you have entered some 'Budgets' or 'Transactions', the 'Reports' will become available. To access them, make sure you are in the 'Budgets' or 'Transactions' screen and rotate the device so that it is on its side. You will then be presented with interactive reports to allow you to analyse your Budgets (rotation not required for iPad).
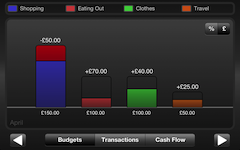
Budgets
The Budgets report shows how much money you have left in each Budget. Each 'bar' in the chart represents an individual Budget. The number underneath the bar is the total Budget Amount, and the number above the bar is the remaining amount. You can switch between showing a 'Percent' or 'Monetary Amount'. The arrow buttons at the bottom left and right allow you to Time Travel backwards and forwards.
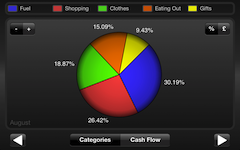
Categories
The Categories report shows your Expense or Income totalled by Category for a particular Time Period, giving you a good idea of where your money is going. You can switch between showing 'Expense' or 'Income', and between 'Percent' or 'Monetary Amount'. The arrow buttons at the bottom left and right allow you to Time Travel backwards and forwards. This report can be viewed as a Pie Chart or a Bar Chart. You can toggle between the two types using the switch at the top left.
Cash Flow
The Cash Flow report shows a history of your total Budget Amount vs your total Actual Amount per Time Period. Up to 12 months (or weeks) worth of history are shown at a time. This gives you a 'Trend' of your Budgets over time. You can switch between showing 'Budget vs Actual' or 'Income vs Expense'.
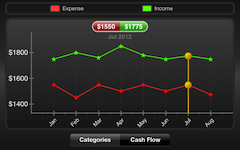
Press and Hold
Press and hold on the chart to show values for a particular Time Period. Slide your finger along to show values for other Time Periods.Pinch to Zoom
Pinch along the years axis to decrease or increase the date range. Double tap to reset.To exit the 'Reports' screen, simply rotate the device back to the upright position (not required for the iPad).
Settings
TopHere you can configure certain behaviour in the app:
Time Period
Choose how you would like to Track your Budgets. You can Track them Weekly, Monthly or Yearly. Whenever you start the app, this will be the Time Period it defaults to.Show Budgets
Choose from Weekly, Monthly or Yearly.Month Start Day
When Budgets are Tracked Monthly, this determines the first day to show. e.g. set it to '8' to display September as '8th September - 7th October'.Week Start Day
When Budgets are Tracked Weekly, this determines the first day to show. e.g. set it to 'Tuesday' to display a week as 'Tuesday - Monday'.Hide Future Transactions
By default all Transactions are included when working out the Budget Balances for the Time Period, including any Repeating Transactions which will occur after the current date. This is best if you want a realistic idea of how much you have left to spend. However sometimes you want to see "Today's" Balance, and ignore any future Transactions. Turning this on will hide all future Transactions from the system.Automatic Syncing
See 'Syncing'Accounts
See 'Accounts'Category Order
You can choose to order the Categories by 'Most Often Used' or 'Name'. If you choose 'Most Often Used' then the more times you use a Category when adding Transactions, the higher it will appear in the list.Passcode
If you wish to protect your data from others, you can set a Passcode which you must enter to gain access to the app. Please remember this code.Currency Symbol
By default the app will pick up the currency symbol from your device settings. Settings -> General -> International -> Region Format. If you wish to override this and pick your own currency symbol, you can choose one here.Syncing *
Top* Pro Feature. Upgrade to Pro via the Settings.
If you have multiple Apple devices (e.g. iPhone and iPad) then you may want to keep your data in Sync.
iCloud SynciCloud Sync
Top Turn on Settings -> iCloud Sync on all your devices to start syncing changes to your data. Once this Setting is turned on for all devices, then any amendments to Transactions, Categories, Accounts or Budgets will automatically be kept in sync. You need to be logged onto the same iCloud account on each device for this to work.Upload Initial Data
When you turn on iCloud Sync for a device, it will ask you if you want to sync your existing data. If you choose 'Yes', then all the data you have entered so far is synced to your other devices. If you choose 'No' then only changes from now on will be synced.Backup & Restore
TopIt is always a good idea to keep Backups of your data in case of accidental data loss. This keeps your data safe, and means you may not have to re-enter all your data if the worst happens. To Backup or Restore your data, tap on the 'Backups' button on the top right of the main Settings screen. Note that you will need an active network connection to perform backups or restores.
Dropbox
Backups are stored online using the popular service called 'Dropbox'. The first thing you will need to do is 'Link to Dropbox'. Press the green button in the 'Backups' screen to do this. You will be prompted to register for a Dropbox account if you do not already have one. It will then request your permission for Debt Manager to access your Dropbox account. If you accept, then you will be redirected back to Debt Manager. You should now be ready to backup and restore your data.Backup
In the 'Backups' screen, you should now have a green button which says 'Backup Now'. Tap this button to create a backup of your debt data. It will create a file with the name which is the current date and time. You can make as many backups as you like.Restore
If you want to 'Restore' a particular backup, just tap on the relevant name. It will validate the backup to make sure that it is valid.Delete
To 'Delete' a particular backup, tap on the red button to the left of the entry.Glossary
TopAccount
Budgets and Transactions can be stored in different Accounts. e.g. you can have separate Personal and Business Accounts.Balance
This is the difference between your Budget Amount and the Actual Amount.Budget
A Budget for a particular Category which defines a limit which is Tracked.Carry Over
This is an amount carried over from a previous Time Period if there was any of your Budget Remaining.Category
A way of categorising Budgets and Transactions. For example 'Clothes' or 'Eating Out'.Expense
Any Spending.Income
Any earnings.Over Spend
This is how much you have gone over your Budget by.Remaining
This is how much you have left to spend within a BudgetTransaction
This is any Expense or Income event.Credits
Top Charts Ray Wenderlich Cocoa With LoveDisclaimer
TopThe data presented in this app should serve as a guide only. We are not accountable for any actions taken based on usage of this app.